Difference between revisions of "Toödsinpua"
(→Board) |
(→Pieces) |
||
| Line 13: | Line 13: | ||
===Pieces=== | ===Pieces=== | ||
Depending on starting layout used, the game begins with each player having 13, 14, or 15 circular coin- or token-like pieces. They face forwards by having their design, if present, oriented correctly for the respective side. Traditionally, these are made out of wood and carved with either a knife or burning, and are all uniform in dimensions. In addition to this, both players have a chief promotional piece, a small square prism or cube, which is located on the opponent's side of the board. Traditionally the tokens are made of wood, as is the board, and are either simply light and dark wood colours (or one is stained or charred much darker than the other), or one is painted with red ochre and the other is painted black or left brown, often with a varnish. In some areas, having one set painted with red ochre and the other with yellow ochre, often with a clear glaze or varnish as a surface coat, became the norm, and so in modern times, red vs. yellow, yellow/beige vs. (darker) brown, and red vs. brown, have become the three most common colour arrangements. | Depending on starting layout used, the game begins with each player having 13, 14, or 15 circular coin- or token-like pieces. They face forwards by having their design, if present, oriented correctly for the respective side. Traditionally, these are made out of wood and carved with either a knife or burning, and are all uniform in dimensions. In addition to this, both players have a chief promotional piece, a small square prism or cube, which is located on the opponent's side of the board. Traditionally the tokens are made of wood, as is the board, and are either simply light and dark wood colours (or one is stained or charred much darker than the other), or one is painted with red ochre and the other is painted black or left brown, often with a varnish. In some areas, having one set painted with red ochre and the other with yellow ochre, often with a clear glaze or varnish as a surface coat, became the norm, and so in modern times, red vs. yellow, yellow/beige vs. (darker) brown, and red vs. brown, have become the three most common colour arrangements. | ||
Each piece is, by the modern production standard, 3cm in diameter and roughly 0,7cm tall, with the chief promotional piece (a cube) being 1cm on all sides. | |||
There are four major types of pieces (with five total forms), as listed below : | There are four major types of pieces (with five total forms), as listed below : | ||
Revision as of 18:33, 9 November 2022
Toödsinpua (Atruozan: [t̪o:t͡s̪imbuwɑ]), also called Toödsin (Atruozan: [t̪o:t͡s̪in̪]), is a board game originating in mid-1800s northeastern Translira inspired by Kutsotolho and Draughts (primarily Kaseh). Kutsotolho, or rather, Chacha, was first introduced by Canangamese traders in the early-mid first millenium AD, where it started being influenced by Traditional Atruozan War Games, especially around Gøskëlmø. As trade relations with Vaniua increased in the late 1700s, vaniuan draughts were introduced to Translira's north coast, especially around the then-outpost of Skëuþmo, and Gøskëlmø, primarily by Balakia. As chacha (and its derivations) had a much stronger presence due to earlier and increased exposure around and south of Gøskëlmø, when compared with farther north and up the Gaflekmages River, there was less influence from draughts in the area, resulting in a geographical gradient of four primary starting positions, with both major groups of positions having slightly different rulesets. As such, toödsinpua can be viewed as a small family of board games.
Much like chacha, toödsinpua is played on an hourglass board. However, unlike this former, the board is substantially smaller. There are four (arguably five) types of pieces, each of which is capable of promotion, and two modes of play - standing captures (where captures occur as in kutsotolho) and jumping captures (decidedly more popular, with captures acting as in kaseh). What makes it stand out as a member of the two game families is that jumping captures form towers as in kaseh (meaning pieces aren't truly removed from play), and primarily that every turn the players role a four-sided die to determine the number of possible movements they may make with their pieces that turn. Most traditionally, this was done with four pyramidal die with two marked corners each, providing the same effect as four concurrent coin flips, with a result of 0 marked apices counting for one movement. This addition of chance to an otherwise abstract strategy game with perfect information is said to emulate luck and happenstance common to longqeuwo war games, and ultimately, true battle.
Equipment
Board
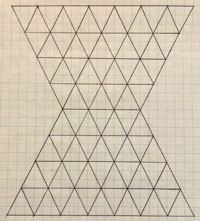
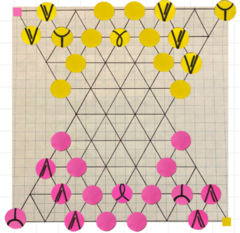
The board is made up of tessellated triangles arranged in an hourglass, such that it is widest at the players' ends, and narrowest in the centre. Like chacha boards, pieces are places on the triangles' vertices, called "nodes". What differentiates the board from the former, is the dimensions. While the former consists of 11 rows and 19 columns of nodes, representing 10 rows of triangles with the centre being five nodes wide, the toödsinpua board consists of only 9 rows and 15 columns of nodes, representing 8 rows of triangles with the centre being 4 nodes wide. That said, due to the nature of the tessellation, even- and odd-numbered rows only contain nodes for even- and odd-numbered columns, respectively (such that [1,1], [2,4] and [3,5] are valid nodes, but [1,2] is not). This means that there are only eight real nodes on the end rows of the board.
The modern production standard size is for the hourglass engraving section of the board to be around 31,5cm in width, with each individual triangle edge being 4,5cm wide. The height of each triangle is thus around 3,9cm, resulting in an engraved section 31,2cm in height.
Pieces
Depending on starting layout used, the game begins with each player having 13, 14, or 15 circular coin- or token-like pieces. They face forwards by having their design, if present, oriented correctly for the respective side. Traditionally, these are made out of wood and carved with either a knife or burning, and are all uniform in dimensions. In addition to this, both players have a chief promotional piece, a small square prism or cube, which is located on the opponent's side of the board. Traditionally the tokens are made of wood, as is the board, and are either simply light and dark wood colours (or one is stained or charred much darker than the other), or one is painted with red ochre and the other is painted black or left brown, often with a varnish. In some areas, having one set painted with red ochre and the other with yellow ochre, often with a clear glaze or varnish as a surface coat, became the norm, and so in modern times, red vs. yellow, yellow/beige vs. (darker) brown, and red vs. brown, have become the three most common colour arrangements.
Each piece is, by the modern production standard, 3cm in diameter and roughly 0,7cm tall, with the chief promotional piece (a cube) being 1cm on all sides.
There are four major types of pieces (with five total forms), as listed below :
- 1 (or 2) Chief(s)
- 2 Camelry
- 2 (or 3) West Archers
- 2 East Archers
- 6 (or 8) Warriors
Each symbol has a design representing it, as shown in the table below. Each piece is also capable of promotion by reaching the opponent's end of the board (in the case of non-chiefs), or by reaching the chief promotional piece (the CPP, for chiefs), whose node no other piece may land on. Warriors are then capable of a second promotion should they successfully return to their end of the hourglass. The non-chief pieces are flipped over when promoted (and then turned 90-degrees in the case of the warriors' secondary promotion), with an alternate design on the other side, also shown in the table :
| English name | Face Design | Reverse (Promoted) Design | Atruozan | Atruozan IPA |
|---|---|---|---|---|
| Chief | Xãiyë | [k͡s̪ãɪ̯̃jɛ] | ||
| Camelry | Oisupa | [oɪ̯s̪upɑ] | ||
| West Archers | Ŕãbyeuwa Üiktämø | [ʀ̝ɑ̃bjɜʊ̯wɑʔ y:t̪:amø] | ||
| East Archers | Ŕãbyeuwa Klõstãzomo | [ʀ̝ɑ̃bjɜʊ̯wɑ klõs̪t̪ɑ̃z̪omo] | ||
| Warrior | Ötsinñãifë | [œt͡s̪iɲ:ãɪ̯̃fɛ] |
When promoted, the chief isn't reversed. Rather, the small, roughly cubic and designless promotional piece is placed on top of it. Its width is one-third to half the diameter of the other play pieces.
Gameplay
Setup
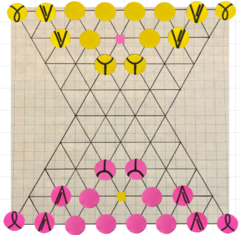
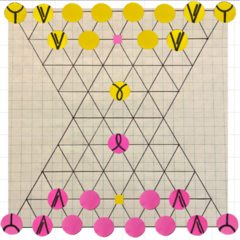
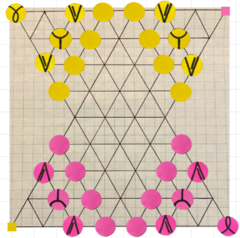
Over time, four major starting positions developed, with each being most common in different areas. The Gäflö and Nonkwouz positions were developed under increased influence from Kaseh. The former is most common in Nolcik, northern, and western Translira. It is by far the most popular variant in and around Gyeutoþmo. On the other hand, the Nonkwouz position is most popularly played by children across the non-polar regions of the Baredinan Atruosphere, as well as on Osteria's Northern Islands and is the most commonly seen in northeast Translira, especially around Skëuþmo. In regions outside the northeast, play usually gravitates towards another form in young adulthood. The dominant family of starting positions in Translira's eastern and southern regions, as well as in Osteria, is the Chacha group, termed as such due to the primary influence being from Chacha. It includes the Tocaca and Plalhã positions, the former being most common along most of the populated east coast, as well as in the centre of the nation inland from Døskëlmø, while the latter is most common in the southeast (including around the Grø̃ Pniþäbëj), the southern reaches of the continent, and most of Osteria, although the Tocaca positions has been gaining traction in the Northern Islands in the past couple decades. It has two sub-types deemed T-S (Tocaca standing) and T-J (Tocaca jumping), based on the type of captures agreed upon before play begins.
The starting positions of the pink pieces for the five positions are listed in the respective sections for each starting position, noting that coordinate positions along a row are notated by counting the real nodes from the leftmost (west) side of the board, such that node [1,3] would be notated as (1,2), and [1,15] would be (1,8).
Note that for the purposes of the following images, the pink and yellow pieces represent a red and yellow ochre set, and as such the pink pieces will be referred to as "red" pieces for the remainder of the article.
Gäflö (Life's) Position
This is the only position with two chief pieces at the start, meaning only one may be promoted at any one point in the game. The red pieces are initially placed on the following nodes :
- Chiefs on (1,1) and (1,8)
- Camelry on (3,3) and (3,4)
- West Archers on (1,2) and (2,2)
- East Archers on (1,7) and (2,6)
- Warriors from (1,3) to (1,6), and on (2,3) and (2,5)
- Promotional Piece on (7,4)
Nonkwouz (Fjord's) Position
This position places the sole chief far out front, making it the position with the fewest required moves to promote the chief and return it to its home side. The red pieces are placed on the following nodes :
- Chief on (4,3)
- Camelry on (1,1) and (1,8)
- West Archers on (1,2) and (2,2)
- East Archers on (1,7) and (2,6)
- Warriors from (1,3) to (1,6), and on (2,3) and (2,5)
- Promotional Piece on (7,4)
Tocaca/Kwied (Tocaca/Bay) Positions
This setup is the most clearly influenced by Chacha, hence the original name most commonly found in Døskëlmø which means "Little Chacha". Depending on whether the game is being played with standing (orthogonal, as in chacha) or jumping captures (as in draughts), the position is slightly modified to avoid the first moves being that of a two-piece capture on the sides of the board. The used when doing standing captures is as follows for the red pieces :
- Chief on (1,8)
- Camelry on (2,2) and (2,6)
- West Archers on (1,3) and (3,1)
- East Archers on (1,6) and (3,6)
- Warriors on (1,4) and (1,5), (2,3) and (2,5), (3,2) and (3,5), and (4,1) and (4,5)
- Promotional Piece on (8,8)
When playing jumping captures, which is played ever so slightly less frequently than standing captures in this layout, the pieces are instead placed as follows, with the warriors being slightly different to the above :
- Chief on (1,8)
- Camelry on (2,2) and (2,6)
- West Archers on (1,3) and (3,1)
- East Archers on (1,6) and (3,6)
- Warriors on (1,4), (2,3) and (2,4), (3,2) and (3,4), (4,1) and (4,4), and (5,4)
- Promotional Piece on (8,8)
Jumping captures in this position is played more frequently the farther north along the coast one travels, as well as in the Central Plateau.
Plalhã ([Powdery] Snow) Position
This position unquestionably dominates in Translira's south, and along southeast coast, as well as in some areas of western (primarily south-western) Nolcik. It is also played frequently in Osteria's Southern Insular Region and on the mainland, with it overtaking a closely related game in popularity across northern continental Osteria and western Saant in the late 1800s and early 1900s. It is the only position with three west archers instead of two. The red pieces are arranged as follows :
- Chief on (2,4)
- Camelry on (1,1) and (2,6)
- West Archers on (1,3), (2,2), and (3,1)
- East Archers on (1,7) and (2,7)
- Warriors on (1,4) and (1,5), (2,3) and (2,5), (3,2) and (3,5), and (4,1) and (4,5)
- Promotional Piece on (8,1)
Starting Etiquette
At the start of the game, the older player chooses their preferred colour of pieces. Therefore, no colour is associated with the starting move, as it is likely to differ from game to game. The order of play is then decided by a dice roll using a d4 — the lowest roll goes first, with re-rolling occuring into perpetuity in the case of (consecutive) ties. Before both parties begin, and after the order of play is determined, the two decide on whether to play with standing (orthogonal) or jumping captures, as the rules for each are slightly different. In the event that both parties cannot reach an agreement, the player with the higher dice roll gets the final say. They then both agree on a starting position to use if one has not been decided upon already, which is often done beforehand. That said, when used during qwuumal war games in the mid- to late-1800s, it was standard practice to decide on the position only immediately before play. Both players then place their pieces, beginning with the promotional piece on the opponent's side of the board, followed by the chief, the camelry, the east and then west archers, and lastly, the warriors, from right to left.
Movement
For this section, movement possibilities will be referred to as "forwards" if it involves movement along the two orthogonal pathways or three diagonal (cross-diamond) pathways most directed at the opposing side of the board, "backwards" if it involves movement along the two orthogonal or three diagonal pathways most directed at one's own side of the board, and "sideways" if it involves the two pathways along the rows. Movement is somewhat different between standing and orthogonal captures, so they will be discussed separately.
At the start of a turn, a single d4 is rolled to determine the number of available movements to the player during that turn. Unless explicitly stated otherwise, no piece may move more than twice in a turn, no more than three camelry movements may be made, and the chief requires two movements to displace once. Once a non-chief piece reaches the opposing end of the board, its direction reverses and it returns towards its starting side, moving "forwards" (backwards) while doing so, and this repeats each time an end is reached. Any movement made on the board in casual play is generally accepted to be rescindable until the player calls out the end of their turn. This does not hold in most tournaments and in traditional play as a war game, where any piece touched must be moved, and any movement made must be final. A chief cannot move again within the turn it promotes.
Standing captures
In standing captures, a piece may move along any of its viable paths, being blocked by allies unless stated otherwise, and may capture by removing an opposing piece from play should it be in the way of a legal move. However, only one capture may be made per piece per turn. In this mode, the pieces move as follows :
- The Chief may move one node in any orthogonal direction, and may capture twice in a turn. Upon promotion, it is capable of moving two squares in a single orthogonal direction in one movement, and may jump over allied pieces in its way.
- The Camelry may move forwards one node along the diagonals (of which there are three). Upon reaching the opposing side and promoting, they may move two diagonal nodes in a straight line within one movement, provided they do not capture.
- The West Archers may move forwards one node orthogonally, or sideways to the right (east). Upon promotion, their movement options do not change, only reverse, such that the legal sideways direction during their return trip is to the left (east from opponent's view).
- The East Archers may move forwards one node orthogonally, or sideways to the left (west). Upon promotion, their movement options do not change, only reverse, such that the legal sideways direction during their return trip is to the right (west from opponent's view).
- All Archers may additionally capture a piece one node in any orthogonal direction surrounding them, and upon promotion may capture a piece two orthogonal nodes away in any straight-line direction, even if behind an another piece.
- The Warriors may move one node forwards orthogonally. Upon first promotion, they gain the ability to move one node sideways in either direction, and upon second promotion, they gain the ability to capture pieces one node diagonally forward-left and forward-right from them, but not diagonally straight forwards.
- The Promotional Piece may not be moved, and no piece may land on its node until moved by the chief.
Jumping captures
In jumping captures, a piece may move along any of its viable path, being blocked by allies unless stated otherwise, and may capture by jumping over an opposing piece along a legal direction, provided there is an empty node immediately behind the target on which to land. Unlike in standing captures, two captures may be made during a turn, provided the jumps are available. During jumping captures, unless otherwise stated, captured pieces are placed underneath the attacker to form a tower as in Kaseh, with only the top piece of a tower removed if one is captured. Control of the tower belongs to the person whose piece is on top, and it may not be broken apart aside from through an opponent's capture. Should a promoted chief be captured, the CPP is dropped where the chief was placed, and that node may no longer be used until the chief is freed and retrieves the piece once more (meaning he is demoted until then). Else, the pieces move as follows :
- The Chief may move one node in any orthogonal direction, and may make a double-jump capture within a single movement, should two opposing pieces be positioned such that doing so is possible. Upon promotion, it is capable of moving two nodes in a single orthogonal direction in one movement, and may jump over allied pieces in its way (though may not jump if an opponent is located behind the ally).
- The Camelry may move forwards one node along the diagonals (of which there are three). Upon reaching the opposing side and promoting, they may move two diagonal nodes in a straight line within one movement. Until promotion, they may only capture by an opposing piece being in their line of movement, landing on a node orthogonally forwards along the diagonal of movement, after which they become capable of capturing along diagonals, landing two diagonals away. This has earned them the nickname of "flying camels".
- The West Archers may move forwards one node orthogonally, or sideways to the right (east). Upon promotion, their movement options do not change, only reverse, such that the legal sideways direction during their return trip is to the left (east from opponent's view).
- The East Archers may move forwards one node orthogonally, or sideways to the left (west). Upon promotion, their movement options do not change, only reverse, such that the legal sideways direction during their return trip is to the right (west from opponent's view).
- All Archers may additionally capture a piece one node in any orthogonal direction surrounding them, and upon promotion may capture a piece two orthogonal nodes away in any straight-line direction, even if behind another piece. Should this piece be a tower, however, the capture is illegal, as it is the only capture in which a piece lands onto the node of the enemy, rather than jumping past it.
- The Warriors may move one node forwards orthogonally. Upon first promotion, they gain the ability to move one node sideways in either direction, and upon second promotion, they gain the ability to capture pieces one node diagonally forward-left and forward-right from them, but not diagonally straight forwards. They must land one node orthogonally fowards along the diagonal direction past the captured piece, similar to pre-promotion camelry capturing.
- The Promotional Piece may not be moved, and no piece may land on its node until moved by the chief.
Winning the Game
There are two win conditions, and one draw condition during play. The game ends when one player cannot make any legal movements during their turn whatsoever, causing them to lose, or if the chief retrieves its promotional piece and successfully returns to its home end of the board (on the end rows). This former can be achieved either through capturing all of the opponent's pieces, or through blocking them. Should a player only have one remaining piece on the board, and not regain any, they may force a draw by surviving for eight additional piece movements, which usually equates to 4-5 turns. In standing captures, should the promoted chief be captured, its promotional piece is removed from the board alongside it, and victory through retrieval becomes no longer possible, marking one of the most significant gameplay differences between the two modes. The only exception is in the K-1 position, where it is only removed if, upon capture, there are no remaining chief pieces on the board. Else, it drops as in jumping captures.
